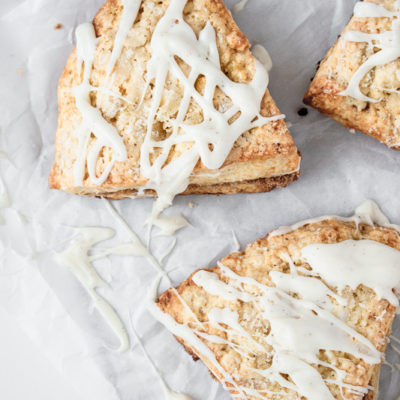
This recipe for vanilla bean scones is something that you should definitely add into your must have’s! These scones are thick and flaky, with a generous helping of gooey cinnamon sugar filling and a delicious vanilla bean glaze on top. The perfect breakfast recipe for transitioning into Fall!

This post contains affiliate links. This means I may earn a commission should you choose to make a purchase using my link. It’s okay – I love and use all of these products, and you will too!
I really can’t believe that it is August and some kids are already going back to school! Summer flew by. Today I’m bringing you a yummy breakfast recipe that is perfect for transitioning into back to school and Fall, but can be enjoyed anytime during the year too!

This recipe for vanilla bean scones make six thick and delicious pastries that are perfect to enjoy on a chilly morning with a cup of coffee, so you’ll definitely want to try these out as the weather begins to cool!
Tips for Making Vanilla Bean Scones
Scones can sometimes be tricky to master because the ingredients and process have to be just right in order to get a thick and flaky pastry that is both tasty and appealing to the eye!

Here are some of my tips for making sure you get the most crumbly and delicious vanilla bean scones:
- Make sure your butter is cold and that it is cubed for easier mixing. This will make the scones rise higher. If it’s hot in your kitchen, you can freeze your butter beforehand! Unlike most baking recipes that call for room temperature ingredients, it is best to work with cold ingredients for the most delicious scones!
- A pastry cutter works best for mixing your ingredients. Some people say that a food processor works best to mix the dough, but I think that it warms the butter up a little too much and makes the pieces of butter too small, resulting in a flatter and more dense scone. I like this OXO pastry cutter!
- Avoid over mixing your dough. This will create tough scones!
- You can freeze dough once it is crumbly. This is great for holidays or events! Just be sure to thaw at room temperature and do not microwave, or the butter will melt.
- Keep the scones as cold as possible until you are ready to bake them. This will ensure that they rise correctly.

How to Make Vanilla Sugar
This recipe for vanilla bean scones calls for vanilla sugar, which is super easy to make and will add a nice extra vanilla touch. You’ll simply want to mix in a splash of vanilla extract with the sugar that is called for in the recipe. You don’t need much. I just eyeball it but if you like to measure, 1/8 tsp. – 1/4 tsp. would be perfect for this!

Take this recipe and make some yummy scones this Saturday for a delicious breakfast treat! I think this is such a versatile breakfast pastry that can be made year-round, but it just seemed perfect for kicking off some Fall baking. I know, it’s only August… but for me, fall starts on August 1st. Ha!
As always, be sure to tag me in your photos on Instagram if you make my recipe or use #bucketsofyum in your photos! I love to see what you are baking.
If you are looking for a more summery breakfast option, try these Blueberry Sweet Rolls with Whipped Lemon Ricotta!

Vanilla Bean Scones with Cinnamon Sugar Filling
Ingredients
For the Filling
- ¼ cup all-purpose flour
- 1½ tbsp packed brown sugar
- 1½ tbsp vanilla sugar (instructions below)
- 1 tsp ground cinnamon
- ⅛ tsp salt
- 1½ tbsp cold unsalted butter, cubed
For the Dough
- 2 cups all-purpose flour
- ¼ cup granulated sugar
- 1½ tbsp vanilla sugar
- 1½ tsp baking powder
- 1 tsp salt
- ¼ tsp baking soda
- ¼ cup plus 1 tbsp cold unsalted butter, cubed
- 1 cup plus 1 tsp heavy whipping cream, divided
- 2 tsp vanilla bean paste (or vanilla extract if you don't have vanilla bean paste)
- 1 large egg
For the Glaze
- 1 cup powdered sugar
- ¼ cup heavy whipping cream
- 1 tsp vanilla bean paste
Instructions
For the Filling
- To make vanilla sugar – combine 1½ tbsp granulated sugar with ⅛ tsp to ¼ tsp of vanilla extract. Mix well.
- In a small bowl, combine flour, brown sugar, vanilla sugar, cinnamon and salt. Using your fingertips, cut in cold butter until mixture resembles sand. Set aside.
For the Dough
- To make vanilla sugar – combine 1½ tbsp granulated sugar with ⅛ tsp to ¼ tsp of vanilla extract. Mix well.
- In a large bowl, whisk together flour, ¼ cup granulated sugar, baking powder, salt and baking soda. Using a pastry blender, cut in butter until mixture is crumbly.
- Add 1 cup of heavy cream and vanilla extract, stirring with a fork until dry ingredients are moistened.
- Turn dough out onto a sheet of parchment paper. Divide dough in half and roll each half into a round. Cover with a second sheet of parchment paper and press each half into a 6-inch disk.
- Remove top sheet of parchment paper and press filling into the center of one disk of dough, leaving a ¼ inch border on the sides.
- In a small bowl, whisk together the egg and remaining 1 tsp. of heavy whipping cream. Brush the egg wash onto the ¼ inch border. Top with the remaining disk of the dough and press around the edges to seal. Cover and freeze for 30 minutes.
- Preheat oven to 400°F. Line a baking sheet with parchment paper.
- Using a sharp knife, cut dough into 6 wedges. Place at least one inch apart on baking sheet. Brush with egg wash and top with the 1½ tbsp vanilla sugar.
- Bake until golden brown, about 20-25 minutes. Cover with foil halfway through to avoid over browning. Let cool on pan for 5 minutes and then move to a wire rack to cool completely.
For the Glaze
- In a small bowl, whisk together the powdered sugar, cream and vanilla bean. Mix until combined and then drizzle over cooled scones.
Notes
- You can freeze dough once crumbly and then bake later. This is perfect for holidays or other gatherings! Be sure to thaw at room temp rather than in the microwave.
- A pastry cutter works best for mixing dough.
- You can substitute regular sugar for the vanilla sugar if desired. The scones may have a slightly less vanilla taste but will still be delicious!
- This recipe was tested at 5,800 feet in altitude and works great at higher altitudes as is. Follow the recipe above!


